 |
| My "HO" card: bahahaha It's 6x3 inch card - all CTMH products
Here's a simple Holiday card I made for my unit swap. It uses the Sparkle and Shine Paper Kit available only in the Holiday Gift guide.
Anyhoo........it was super easy to make. If you are interested in a card workshop making these- shoot me an email or comment.
|

Monday, November 18, 2013
Sparkle & Shine "Ho" Card
Monday, October 21, 2013
It's FALL y'all!
OK, I am not from the south....
but that is just way too much fun too SAY!
 |
| Fall decorating ......pumpkin towers! |
 |
| Make your own pumpkin towers with craft pumpkins.....cute! |
 |
| Look at those pesky mice....EEK! |
I made my pumpkin towers out of CRAFT pumpkins this year instead of real ones. So next year I just need to take them out of storage......sweet! I also love the Martha Stewart mice I added this year.
Maybe they will frighten the real ones away!
Read on to learn how to make these polka dot pumkin towers yourself. I added some photos I took as I went along for reference.
Supplies:
2 white foam craft pumpkins (Michaels)
2 orange taller craft pumpkins (Michaels)
I/2 inch diameter dowel (from Michaels) I bought the same time as my pumkins to be sure it would be long enough to go through both of them, have a about a foot below them for anchoring in soil and and at least 2 inches on top for tying ribbons onto.
Black acrylic paint
Spray satin clear sealer
Sponge applicator
CTMH 1 1/4" punch
Small piece of cardstock to punch stencil for circle
Power drill using 1/2 inch drill bit
 |
| Polka Dot Stencil Supplies |
Drill holes in the top and bottom of all pumpkins.
Prepare the circle stencil by punching a hole using the craft punch and cardstock. I sealed the stencil with the spray sealer on both sides to stiffen it and make it water resistant.
Squirt black paint onto a paper plate.
I just held the stencil with one hand as I sponged the stencil with the other.
Wipe off any mistakes with damp paper towel right away.
I wiped off the stencil on a dry paper towel between each polka dot to prevent smearing.
I stenciled in a triangular pattern and in sections from top to bottom. I had to wait
for my paint to dry.
My paint had a metallic component and it took an hour to dry.....forever! That was frustrating to wait for it to dry so I could paint down and around the pumpkin. Once dry:
I speared my dry pumpkins and took them outside to spray the spotted ones with a clear satin sealer and dry. It dried quickly.
I also painted the top of the dowel sticking out of the top pumpkin black and sealed it also. I recommend sealing the entire dowel because you will insert it into soil and it may prevent decay from the soil.
 |
| Paint the top of the dowel black and tie ribbons on |
Last year I used real pumpkins and had a bigger white one on the bottom and a small orange one up top- I flip flopped it this year. Either way it looks good.
I also had purchased a couple metal monograms from Hobby Lobby last year and thought they looked great on the pumpkins. I love the bows too.
 |
Pumpkin Towers from Craft Pumkins? Yes please
|
Use what ever kind and color of ribbon you want. I used 3 rolls from Michaels; lime green sparkle, spooky purple sparkle and the wired black with silver dots for the bow on top.
I almost ran out and got another roll of the black to make streamers coming down but I was just too lazy. Next time I drive by, I think I will pick some up and add streamers. It is wired ribbon so I think that will be a nice touch.
I made the big bow by just looping ribbon and tying it with floral wire then fanning it out and poufing it up. There are a million you tube tutorials on this.
One roll was just enough for 2 bows.
I used the black planters I had my summer plants in and placed a large silk fall leaves candle ring in the middle and then inserted the dowel and pumpkins all the way in, so they were firmly anchored.
If you make these I hope you post a link to photos because I would love to see your take on them. Really so many different things you can do with these. The best thing? Next year you just pull them out and if you want to switch up the ribbons- thats all the work you have to do. Ta da!
Wednesday, October 16, 2013
We can now order from the Holiday Gify Guide!

Today is the first day you can shop from the new Holiday Gift Guide!
This is a fantastic promotion, which lasts till the end of December (OR while supplies last).
When you spend just $100, you can choose any 'star' item in the mini-catalog for FREE!
My favorite items in this Holiday Gift Guide are:
Sparkle and Shine Paper Kit X7168, $9.95
Sparkle and Shine Scrapbooking Workshop on the Go kit G1071, $29.95
Sparkle and Shine Washi Tape (3 rolls: Juniper, Ruby, metallic silver) Z1907, $14.95
Sparkle and Shine Dimensional Compliments X7176C, $5.95
Sparkle and Shine Assortment Z1860, $5.95
Santa Claus stamp set (very vintage 1950-1960s looking) C1567, $13.95
Season Tweetings Gift Bag Kit (6 printed cloth bags w drawstring in red and green) Z1914, $8.95
And so much more…..but these are my favorites and I love them. The silver paper in the paper packs is a beautiful muted metallic sliver.
Many items are while supplies last so if you like it and must have it, order it as soon as possible on line HERE or call me to place your order for you.
Monday, October 14, 2013
Christmas Card Class
 |
| Make 15 Christmas Cards from one $24.95 kit
Frosted Christmas Card Workshop
Join in the fun!
I will be holding a Christmas card workshop making 15 cards using the CTMH Frosted card making Workshop on the Go Kit on Monday, October 28th and another session Monday, November 4, from 6:30-9:30 pm, at my studio. Cost is $24.95 for the kit (plus shipping/taxes).
Here's what is included in the kit:
1 – My Acrylix® Frosted Cardmaking Workshop Stamp Set (D-size)
2 – Frosted B&T Duos® Papers 5 – Cardstock Sheets (2 Colonial White, 1 Kraft, 1 Olive, 1 Ruby) 15 – Colonial White Cards & Envelopes 1 – Champagne, Colonial White, & Silver Baker's Twine (10 yards) 1 – Silver Glitter Gems (108) 1 – Instructional Brochure
If you are local and want to attend, please let me know by noon on October 15th or October 18 (for Nov. class) or you can place your order online by clicking on the link provided HERE by those dates because we need time to get the supplies ordered/delivered. Please bring your adhesive and your paper trimmer to class. I will supply the different inks and blocks for the class.
(You may already have the basic tools, such as inks, stamp blocks, or other tools/supplies tools are needed to complete this project and you can order what you do not have: Contact me for details)
|
Wednesday, October 9, 2013
Huntington Card
 |
| Cute 4 1/2 x 4 1/2 card using CTMH Huntington papers |
I made this card this week for my consultant swap. I modified a card from the idea book using the saw stamp set and paper kit. The pennants are Barn Red and Whisper stamped in Slate. I stamped the wreath using our non pigment inks in Cocoa, Honey, and Autumn Terra Cotta. I did the sentiment in Autumn Terra Cotta. I popped the wreath up on foam tape for dimension and I used our hemp colored bakers twine for the bow and slapped it on with a glue dot. It was a pretty easy card to make and I love how it turned out.
Want to learn how to make cards? I teach free classes and workshops. Contact me to get on the calendar. I am teaching Christmas cards now: the class is free and materials for 15 cards is $29.95. We are using the Frosted Card Workshop kit. Again, contact me for dates and to reserve a spot.
Tuesday, September 24, 2013
National Stamping Month Special
Get the exclusive You Are My Happy stamp set trio in celebration of National Stamping Month! During the month of September, when you make a purchase of $50 or more, you qualify for this whimsical stamp set trio for only $10. You’ll love using the playful alphabet, light-hearted sentiments, and fun images for a variety of occasions to give a cheerful touch to your projects, with a full retail value of $47.90.

 |
| You Are My Happy Stamp Special Have 3 times the fun with our new stamp set trio—just $10*! |

Click on the shopping cart to get a shopping! Once September is over- this stamp set is gone. :(
Monday, September 16, 2013
My Other Side
 |
| Finishing my 1st Half Marathon at 60! Wabash Trace Marathon 2013 |
 |
| Dreams do come true...........Tough Chik Deb Bahr finishes her first Half Marathon! |
As a result, I was restricted from all training for months as I recovered and rehabbed. I was released to run March 1, 2013. I did my 10k nine days later......in 1 hr and 42 minutes! Oh my. I walked the hills and flats & ran downhill. I had to start from ground zero AGAIN and build up slow to prevent injury. I kept at it.....running 3 times a week. I did my first duathlon in late April, just a week after I was released to cycle. It was a run 2 miles, bike 15 and run 2 mile......I came in DFL (dead f'ing last) but I was BACK!!!!! I did 2 5k's and a 7k trail run in May and by June was up to 6 miles! I started my half marathon training and registered for a September 14 race.
I ran FAITHFULLY. I ran when running was the LAST thing I wanted to do. But I got up at or before dawn to run before the heat and humidity hit. I began swimming again in June at the urging and support of my physical therapist Claire, I registered for the Omaha Triathlon July 21. My PT had so much faith in me that they SPONSORED me! What? I cycled but not as much as I should have. The Omaha course was extremely hilly for the bike and run- it was grueling. A friend rode the bike course with me to be sure I could make it up the hill on my Trek hybrid and 60 yr old legs. I will be forever grateful to Liz for that.
I really focused on running and swimming. I was nervous about swimming post surgery, let alone in a freaking lake, without the security of a wetsuit. I went to as many open water swim practices as I could, my PTs with me for 3 of them. I did open water swims each Saturday in a local lake- I would conquer my fears. My PT team even did the Tri with me and for 3 of them, it was THEIR first!! I finished it with a PR from 2012's sprint Tri. I was amazed because it was just over 6 months after my shoulder surgery and I was back doing Triathlons in open water! I did another sprint Tri in late June then 2 more after the Omaha Tri.
My half marathon was closing in. I was getting in long runs of 7, 8, 9, 10 and 12.75 miles. I was slow but I was steady and injury free. I picked a race on a flat limestone trail with a nice tree canopy. Race day came and I felt ready. I was calm yet excited. The temp was around 58 when we started.....perfect. I felt good from the start, kept my normal easy pace and took care to keep hydrated. My goal was to finish and to run across the finish line with a big smile......time did not matter. My bar was LOW...after all I turn 61 in a couple months!
I played cat and mouse with some runners but stayed my course and raced my own race. I had a camelback filled with Hammer Perpetuem and a Maia Sports bra stuffed with honey stingers. I took Gatorade at each water station. My only frustration was I could not listen to my music on Pandora due to connectivity issues in the country with the tree canopy and the only music on my phone was Justin Timberlakes 20/20 Experience; so I listened to that over and over for 3 hours and 19 minutes.......good thing I love it. I felt like he was running with me....it kept me going.
About mile 10 I noticed a little twinge of tightness in my left calf but added some walking in to rid myself of it and it quickly went away. About mile 11.5 it came back and by mile 12 I could only run in bursts of 30 seconds before my calves seized up. I stopped twice to stretch but it kept coming back. I tried to run across the finish but my calves just froze up if I tried, so I walked as fast as I could. I made it, with a smile and wanting to do it again.
Anything is possible if you want it and work for it. I had so many people encouraging me along my journey; my family, friends and other athletes who have since also become my friends. I am so grateful that I am able to achieve this at my age, for one day I won't be able to run like this. These are special memories I will carry with me always. Just wanted to share my story...there are others out there that are similar and perhaps even more inspiring but this is MY story and I am pretty proud of it.
Thursday, August 29, 2013
I Run Because
 |
| http://toughchik.com/drafts/IRunBecauseLarge.htm |
I LOVE this shirt! As members of Team Tough Chik, we had the chance to provide our sentiments on why we run. Our head chik, Shannon, then crafted this running tee with all of our reasons of why we run. We do YOU run? I bet you can find it on here! Motivation & inspiration from an amazing group of women working hard to achieve their fitness and endurance goals. I have learned so much from them. I think these shirts will go fast so if you like what you see- click this link or go to toughchik.com and running shirts. Just $22.
I also wanted to announce that I was blessed to be selected as an ambassador for Team Tough Chik! I am thrilled to have this honor so you will see me posting more about that. We open recruitment for new members in October and I will post links. The Tough Chik performance clothing is made specifically for women and its TOUGH too! Great for triathlons, cycling, running, crossfit- whatever your passion is.
Thursday, August 8, 2013
August Special: CHOCOLATE!!!!!
 |
| August Stamp of the Month FREE with $50 purchase! I am so excited about all the new papers, stamps, embellishments, kits and tools in this new idea book! I especially LOVE the chocolate themed August stamp of the month (A Chocolate Affair, S1308A) I can think of so many ways to use this for tags, cards, scrapbooking, and 3D crafts. My favorite 3D item using the stamp is the one above that displays our new wired frame. Cute Cute Cute. The August SPECIAL is that when you spend just $50 for Close To My Heart products that you qualify for this stamp set FREE! Sweet deal indeed.....yes please. Incredibly Cool Crafts In love with the artwork we created with this stamp set? Get ready to make it yourself! Purchase the materials listed here along with your deeply discounted Stamp of the Month set to get started! Free stamp set only until end of August and then it's gone. :( Materials Needed
To create the techniques featured in this artwork, follow the helpful hints outlined below.
|
How sweet is that?
I think it would be cute to make some chocolate themed recipes incorporated into this piece also.

Friday, June 28, 2013
Let's Celebrate New Fall/Winter Idea Book!
 |
| It's never to hot for mink, jeans and a new Idea Book! The release of the new CTMH Idea Book is just one month away! Right now, our national convention is taking place in Disney World....the happiest place on earth. New products are being revealed and garnering oohs and ahhhs! I have seen the new products and you will LOVE them! Can I say we have ANOTHER CRICUT CARTRIDGE? Why yes, yes I can........and it is called Artbooking. The big focus is creating scrapbook layouts with it, including titles, frames, mats, emnbellies and MORE. New paper kits with trendy colors and themes.....love the electronic gamer theme. Mothers of boys will know what I mean. The winter kit is just amazing with soft muted shades of blues and teals. I will be hostig an open house in August so you can come see the new products first hand. Free Idea Books to my current customers and just a couple bucks to those attend that have not ordered yet. If you order at least $25- you get one FREE! I dont kow how each year CTMH produces such amazing new products.....well Yes I do- they ARE CTMH! I can't wait to show you what they have in store for us! So that is why I am sitting on my friends deck in a mink, and jeans, On a hot day. Ok, well it may have had something to do with my yummy cocktail! I am shameless. Dont judge me. :) Oh....and if you could be so kind to hit the Join This Site button to become a follower......I would LOVE THAT! |
Tuesday, June 18, 2013
3 Current Specials
June is a bountiful month for specials and we have THREE promotions going on:

Show your support of troops and country with new patriotic stamp sets — available only from June 1 to July 31, 2013!
As a show of our support, Close To My Heart will donate $3 from each B-size My Acrylix® Courage stamp set and $5 from each D-size My Acrylix® Home of the Brave stamp set to the USO, the leading, most recognized military-support and services organization in the United States. Show your support today—stamp style!
Love these sets.........order yours while supplies last!
- Make It A Banner Day
- Relief for Oklahoma $2.95 Stamp Set
- Let's Get Patriotic Stamp Sets

Show your support of troops and country with new patriotic stamp sets — available only from June 1 to July 31, 2013!
As a show of our support, Close To My Heart will donate $3 from each B-size My Acrylix® Courage stamp set and $5 from each D-size My Acrylix® Home of the Brave stamp set to the USO, the leading, most recognized military-support and services organization in the United States. Show your support today—stamp style!
 |
| Home of the Brave |
 |
| Courage Stamp Set |
Thursday, June 13, 2013
While supplies last SALE!
Huge Markdowns on paper, albums, embellishments, journalist markers and more! Start shopping....Click here!
Wednesday, June 12, 2013
Oh Say Can You See........my 3 Dimensional Flag
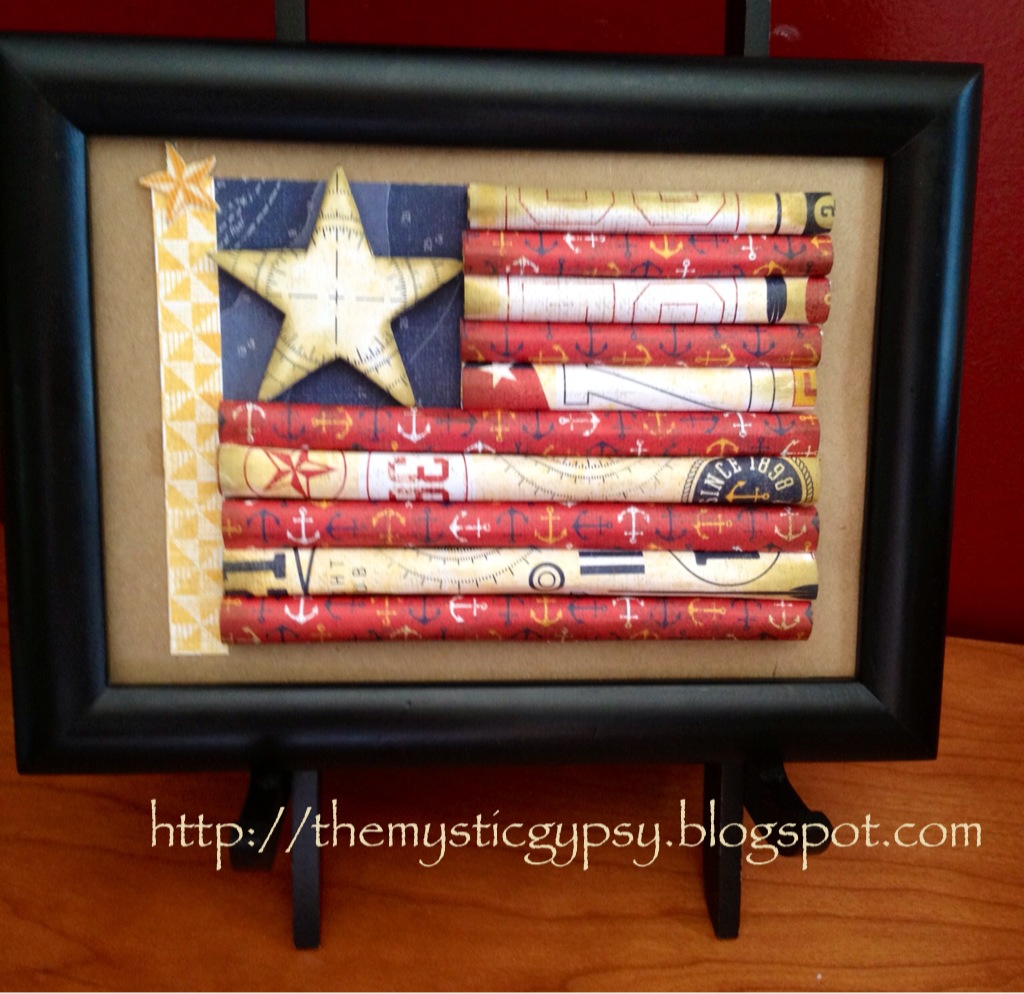 |
| 3D Framed Flag |
3D Framed Flag Project
One black 5x7" frame (with glass removed)
Bonding memories adhesive or liquid glass.
3D foam tape
Desert Sand Stamp Pad
Dimensional Element Star or smaller stars
Kraft Cardstock: 1 sheet
Tommy paper kit: I sheet red b/t with Anchors (about I sheet), 1 sheet of diagonal stripe b/t (I used the opposite site), 1 small piece of the honey small pennant b and t paper.
Instructions:
Kraft cs: 5x7
· Adhere to inside of your frame. Either on top of glass or remove glass entirely and adhere to the solid frame back to prevent bubbling or puckering.
Tommy bulk b/t (reverse side of the diagonal stripe) for the white stripes and to cover star with: 1.5"x 5" (3), 1.5"x 3" (3), 3x3 (1)
· Roll into cylinders and set aside. Use a pencil or pen to roll the pieces uniformly and slide off once edges are adhered.
Tommy Red Anchor b/t or same color red cs: 1.5"x 5" (3), 1.5"x 3" (3)
· Roll into cylinders and set aside. Use a pencil or pen if necessary.
2x2 dimensional elements star
· Using a piece of the lighter colored bulk b/t, trace star, cut out and adhere b/t to star, distress edges w desert sand.
Tommy b/t small honey pennants (reverse side of anchor b/t): 1/2"x 5"
· Distress w desert sand if desired
Tommy outdoor denim map b/t: 2.5 x 2.5 (1)
· This piece will be your navy background for the Star.
Once all items are prepared, assemble and adhere onto Kraft cs within the frame using the bonding memories. Distress with desert sand as desired. Pop up star with 3D foam tape. I put mine completed frame on an easel but you could use the navy and white twill to hang it on a door or the wall.
Thursday, May 30, 2013
Race Memories- Studio J Style!
Scree! Look how great these racing layouts came out using the digital online scrapbooking that is STUDIO J! I made all 6 pages in 1 1/2 hrs. and one glass of wine. Bahahaha!
I know I sound like a broken record but I cannot say enough good things about online scrapping in Studio J. I am hopelessly HOOKED.
 |
| TeamTough Chik! Studio J using Superhero kit |
 |
| Studio J Sports layout using Later Sk8tr kit |
 |
| Diva Dash layout in Studio J |
Thursday, May 16, 2013
Race to get your Dream Pop kit before it's gone!
 |
| Just a couple of divas! |
 |
| Diva Dash 5/12/13 Best mothers day EVER! Had new PR in the Diva Dash 5k then lunch with my boys and lots of flowers! I think my Diva photos will look great scrapbooked using the Dream Pop paper kit! Remember, supplies are limited. Spend just $35 and get your for just $10! Click on the shopping cart to the left and join my online May party order, in the lower left portion of the screen. Link your Studio J orders to the May party when prompted during checkout. Don't forget to order the May stamp of the month to use with your Dream Pop kit. I have files to send on request for instructions to make layouts using the kit and stamp set! So race to get your order in before this fun special is over! |
Monday, May 13, 2013
I am a TRIATHLETE
 |
| 2nd place in age group! Omaha duathlon |
Thursday, May 2, 2013
National Scrapbooking Month 2013
I am happy dee dap hap happy about this May special! Look at these summery colors! I love the textured matte/glossy patterned card stock and the printed pages are just making me SMILE.


How to get your hands on it:
Be a Customer: Place a minimum order of $35 of current product & get the Dream Pop paper packet (valued at $19.95) for just $10. Get one $10 Dream Pop paper packet for every $35 spent.
Be a Hostess: Hostesses will receive one free Dream Pop paper packet when their May Gathering sales total $400 or more, excluding tax & shipping costs.
Become a Consultant: New Consultants who enroll during May will receive a Dream Pop paper packet for free with their New Consultant Kit....PLUS I would LOVE to have YOU on the Mystic Gypsies Team!!!
Click HERE to begin shopping!
(Make sure to JOIN the May EZ Invite Online party order in the lower right corner of the page.)
(Make sure to JOIN the May EZ Invite Online party order in the lower right corner of the page.)
Get your hands on it through me and I'll send you this full-color kit guide to help you create scrapbook layouts, cards, & 3D items.

I am using this kit and workshop to make my pages when I do the Color Run this month.....and the Diva Dash! I love that the turquoise patterned sheet looks like chalkboard art plus it has has BICYCLES on it! Loving it! This only available for a limited time so if you like it- get a shopping and don't miss out! I have seen some beautiful artwork done with these papers- I really like it when you incorporate black letters or photo mats in- that really is a nice contrast. Would love to see what everyone does with theirs!
Monday, April 15, 2013
Save your Race Day Memories
Studio J is an AWESOME quick and easy way to create online digital pages that preserve your race day memories in photos and journaling. Here are some events I did last year:
Tips for creating race or event layouts:
I am in LOVE with Studio J because I can finally get the photos off my flash drive or PC and preserved for generations to view. I have had PCs crash and flash drives deteriorate as well as those old floppy discs (yes I have photos on those antiques!) but unless there is a flood or fire, my scrapbooks will be safe.
 |
| Taco Ride...Margaritaville! |
 |
| Running & Triathlon: Medals get lost, my memories will not be. |
 |
| My first Trail Run...saved to show my grandkids someday! |
 |
| Digital Scrapbooking of my races...yes please! |
- Take a photo or screen shot of your time and splits, save as jpeg then upload jpeg to Studio J and drop in a photo well.
- Save your race bibs, write your stats on them and insert them behind your finished pages for the event in your top loading album.
- You can also store your medals behind the pages but its gets bulky so I take a photo of my medal and any other awards or trophies and upload the photos of them instead.
- Journal your emotions and feelings of the day, not just the people and things.
- Pick a kit that appeals to you and captures the colors of your photos- but remember you can always change the colors of a kit to meet your needs.
- Look through all the Stickease embellishments in the dropdown- there can be some GREAT quotes and phrases you can drag onto your page.
- Create a text box on your photo to make comments or label your photos. I make sure the vellum default is turned off so the background of the text box is invisible and I pick a font color that contrasts with the area of the photo I place it on.
I am in LOVE with Studio J because I can finally get the photos off my flash drive or PC and preserved for generations to view. I have had PCs crash and flash drives deteriorate as well as those old floppy discs (yes I have photos on those antiques!) but unless there is a flood or fire, my scrapbooks will be safe.
Subscribe to:
Posts (Atom)